Showing posts with label tutorial. Show all posts

Wednesday, March 3, 2010

Veil tutorial... 80's style

Well, I am actually DONE with my current job! It worked out really great for me- if you want to hear the hilarious story, you know where to find me.

Bad news is I'm still sick - today I've been super foggy and stuffed up - I feel hot but my temp is pretty low. Never good the week of your bachelorette party!

Since my bachelorette party is 80's themed, I really wanted to do a neon veil. So I decided to DIY. And hope that through my sick stupor it turned out better than past attempts. Luckily it did. Here's your lackluster DIY instructions...

I bought a yard each of pink and orange tulle at Jo-Ann's and cut them in half. I also got a comb for the veil from their bridal section. Probably spent too much on it (I think it was around $6!) but time was of the essence. I also got pink embroidery thread and re-used a thick needle I had from this (failed) project. When I got home, I broke out the glue gun.

That's right, set it down on a KFC menu. Why the heck not.

I glued the left corner of the tulle (all 4 layers) to the left corner of the comb. The glue went on the part of the comb that would rest on your head, and the tulle wrapped over it.

Great picture, right? Sicky couldn't break out the macro? Ugh, pathetic.

Then I did the same to the far right side, and then the center.

I continued gluing until it was all attached. It was still too poofy though, and that's where the thread comes in. I threaded the needle around the base of the comb.

I went right to left then criss-crossed left to right.

I tied off the end and secured it with a dab of glue. At this point I also realized that the macro might help. Finally!

I figured you'd all want to see it on. But remember, I'm sick. No makeup. Hot & cold. I put in the thermometer for effect.

Ok so minus the sick bride, it looks so awesome!!!!!

The tulle was super cheap- less than $2/yard - so if you could find an affordable comb this would be a great thing to make for a bachelorette. You could do white, their wedding colors, or something to go with their theme. I know a lot of bachelorette parties do black and pink decor, and I think black and pink would look awesome in a veil!!!

And yea, I know it's weird that I'm making this for myself. But I just HAD to!!!!!!!

What color would your veil be?

PS- if any of you bloggers are going to be in NYC this weekend, let me know!!! Because I will make you attend!!!

Saturday, December 12, 2009

Bakerella?

Because of my awesome shoe-loving friend Cher, who shared a miserable work experience with me for a year or two, I discovered The Pioneer Woman. I. Love. Ree. I read her whole "black heels" thing- every post- about her meeting and falling in with Marlboro Man, her now husband, and I suggest you do too. Immediately.

Ree linked to her friend recently... Bakerella. WHERE HAS THIS SITE BEEN ALL MY LIFE???? I tweeted about her and everyone was all "duh, Pugs, where have you been?" Well I guess the answer is IN A HOLE because I was missing out!

I saw her recipe for the classic Red Velvet Cake Balls and swooned. I made them last night as a trial and they're great!

Lesson learned- if you don't really like white chocolate, you won't like red velvet dipped in it. I made a few white chocolate ones but switched back to regular milk chocolate, and used the leftover white to drizzle. FANCY and so easy.

FYI the chocolate ("bark") I used is what Bakerella recommends, the Kroger brand. Seriously, if anyone wants some and doesn't have a Kroger, I'll send you some. It's THAT easy to use and fool-proof. Look how pretty they are!

Like Bakerella suggested, I froze the balls for a little bit before putting them in the chocolate. I don't know if that's why, but all of mine busted out a tiny bit on the bottom! Luckily it wasn't at all noticeable when they were sitting normally.

A few tips: See that little chocolate spillover "base?" It's easier to avoid them if you use a FLAT surface and not a plate with edges that raise a bit... if you're like me, and use a plate it's possible that they'll slide if placed near the edge. If you notice chocolate pooling, take a toothpick and outline closely around the base. When you remove the hardened chocolates, the spillage will easily snap off along your traced line. Also- if you don't have wax paper, use tin foil. Not just a regular plate. Or they won't come off without breaking and you'll have to do some cake ball repair.

My friend Angie also suggested adding the frosting a little bit at a time, saying that if the cake is moist, you won't need the whole can.

The above is all we had left (I mixed with my hands while a tipsy Mr Pug added the frosting for me. I waited until it was almost dough-like and I knew we didn't need more. We probably had more left in the can but SOMEONE was eating finger-swipes of frosting while we worked! (Hint... it wasn't me!) PS- I am now wondering if he purposely left a smiley face in there?

Mr Pug just went to Best Man A's house to watch the IU game and I made him take some with him:

I hope they're a hit! I know we really enjoyed them.

These babies are going to be great to bring out for the holiday celebrations, they are elegant and yummy. I also plan to make these for at least one of the summer wedding celebrations. I love that you can customize the colors and decorations with different color candy melts, chocolate drizzles, and sprinkles. Although if you do sprinkles, be careful- this chocolate isn't like regular melted chocolate. It hardens very quickly so you need to do sprinkles right away.

This recipe yielded 61 cake balls for me (yes, random number) and I used a mini-scoop from Pampered Chef. After scooping though, I hand-rolled the balls to tighten them. They are a pretty good yield from just one box of cake, so if you wanted to do these as favors, or for a candy buffet, they'd be easy to do! (Hint- especially if making them in bulk, I'd bake the cakes in advance. Baking it and letting it cool was time-consuming.)

Please try them (and hopefully, learn something from my helpful hints) and then tell me how they go!

Tuesday, September 8, 2009

Guest Chart Madness!

So, anyone remember my post about the google documents form I used to collect addresses? If not, click here!

Mr Pug and I never really set in stone a guest list. We tried to via excel a few times but always would randomly remember someone we forgot, and then forget to add them to the list. Emailing out our address collection form link made it easy- "Oh we forgot cousin Larry, send him the link!" But then I was left with a massive BLOB of an excel sheet- just a list of names, addresses, and info in the order they were filled out. OCD FREAKOUT!

I decided to organize and REALLY make a list this time. I took our guests' names and significant others' name columns from the address form collection sheet, and made a new document. I then split them up into categories. I am really visual, so categorizing them in front of me like this helped me realize who I might be forgetting.

Yea, I completely made up the names for this sample one! Anyway, the categories helped me see who "went together" and I realized there were a few addresses I needed to get. Whoever's address I was missing, I added their name in red. As I get their information, I will make them black again.

I also put estimate numbers in each category. The lower number is likely the number of people we will invite- we are roughly going with the engaged/living together rule for plus one's- but along with the "dating for a year" part we are adding and/or "we have met the plus one." So the lower number of the ranges in parentheses is likely our invite number. The higher number is if everyone who is unattached had a plus one. We'll likely be a little lenient with our plus one's- aunts and uncles who are unattached will get a plus one, and we will talk to friends about what they plan/want to do, as I'm sure some from out of town will not want to bring their significant other if the rest of the group are going solo.

Ok, back to the chart! I added up the low numbers from the ranges and then the high number from the ranges, to get a total range of invitees. I scaled down our list to make the example above- our real guest range is 194 on the low end, 245 on the high end. That means if everyone is allowed a date, we'd be at 245!!! HECK no, that isn't even feasible. But for some of our friends, their significant others become our good friends, so I know we'll have a few plus one's we can't currently plan for. The average of these numbers is 219.5 (we'll say 220.) Apparently 30% of the guests you invite won't show. Since we're both pretty much the first ones in our families to get married, we've had a lot of excitement, so I will move that to 20% for now- which means of the 220 average, we'd have 176 attendees. Taking 20% off our range, it becomes 155-196. Keeping that in mind helps me recover from the stroke 245 gave me.

Another thing that helps calm me down is knowing that each person doesn't get an individual invite (we are putting the invitees on the outside envelope label, not doing inside envelopes like some people do.) Right now we only would need 104 actual invitations (and the same goes for Save The Dates) which saves us on postage and printing costs! YAY!

What woes have you encountered while working on your guest list? How are you limiting plus one's? And, in your experience, is the 30% rule true?

Friday, July 31, 2009

...we have addresses!

Thanks to some tutorials I found on Weddingbee, I have created a form to capture our guests' information! I created it using Google docs, which was very easy. If you have gmail, you can just access it from your gmail page (the documents link on top near your calendar and reader.) If you don't have gmail, you can go to the docs link above and create a log-in- you don't need to use gmail to use docs.

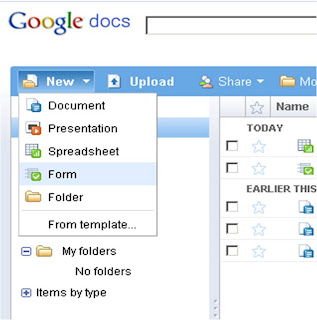
Once you are on your Google docs page, under "New" select "Form" (see below.)

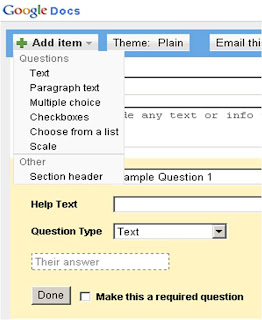
Fill in the survey with the pertinent questions. You add a question by going to "Add item" and selecting the type of question you want. Select "Text" if you want them to have a short answer (one line.) Select "Paragraph text" for a longer answer. "Multiple choice" can be used for anything with multiple answers- you could potentially use this as an RSVP type thing, and ask "chicken or fish?", I used it for the states. Yes, I have to type in all 50 plus DC but it was worth it. Knowing the state song from grade school really helped me out!

Don't forget that you can make any question required by selecting the box at the bottom of the question. I did this for the address questions since they are vital!

The things we asked were: Their name, their significant other's name, address line 1, address line 2, city, state, zip, phone, preferred e-mail, alternate address (in the question we noted that if they are going to move, put what address they'd like us to send things to, etc), questions/comments, and any dietary restrictions. We included the dietary part since we are planning a chicken sit-down dinner, and would like to know if anyone has allergies or is a vegetarian ahead of time. You can customize this as much as you want! The choices are endless!

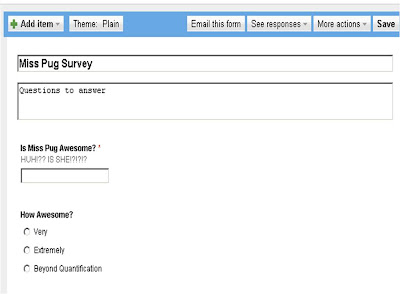
When you are done, your page will look like this. Click "Save" on the top right.

Then, if you so choose, click "Theme" (this one is set to plain currently, above) on the top left.

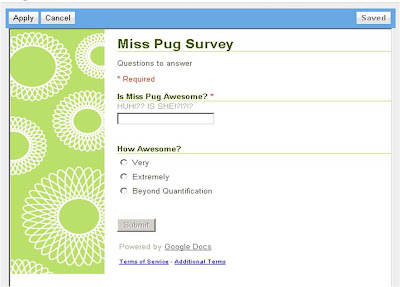
You will be given a bunch of themes to choose from. I chose this green one, titled "flowers." Hit "Apply" (see below- top left) to select the theme, or hit "Cancel" to go back and choose another.

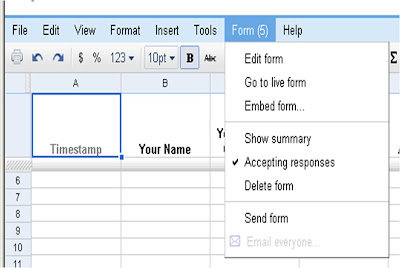
Once this is all saved, exit the form. Walk away for a minute. Give google a break! After a moment or two (likely because I'm on a PC and it stinks!) it will be listed on your Google docs home page. Click on it to open it. If you're like me- you'll have a mild meltdown, because the spreadsheet pops up- not the form! Don't worry- this will be good, since it's where the form entries will be stored and organized. But in order to distribute, you must do this. With the spreadsheet open, select the "Form" menu (see below) and go to "Go to live form." You can select "edit form" if you would like to change anything.

When the published form pops up, just copy the URL and send to family and friends. I did a quick test to see if it worked- filled in "TEST" in all the areas and then went back, opened the spreadsheet, and it was there.

You can use the spreadsheet to help organize your guests and keep track of addresses! This will be endlessly helpful for us. How will you utilize Google documents for your wedding?